Disclaimer: This post contains ads and affiliate links
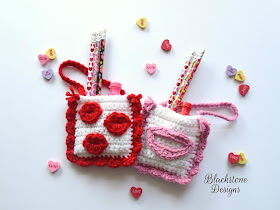
These Mini Treat Bags are so fun and have so much potential! They could be made for kid's classrooms, teachers, or even a spouse. The hearts on the front are a wide open canvas to add your own personal touch with fabric paint, patches, surface crochet, or whatever your heart desires.
If you're like me, you don't like to give out candy, so here is a small list of other items that will also fit inside:
1. Fruit Snacks
2. Lip Balm
3. Mini Lotion
4. Deck of Cards
5. Gift Cards
6. Mini Notepads
7. Ring Box
I also tried it out to find that 5-6 Clover Amour crochet hooks fit inside, in case anyone is looking to send me a Valentine ;)
You may also like the Valentine Kisses Treat Bags
VALENTINE'S DAY
MINI TREAT BAGS
Get the Ad-free PDF on Ravelry
Materials
Worsted Weight Yarn (#4)- 1/2 oz Color A
- 1/2 oz Color B
G/6/4.0mm hook
Yarn Needle
Scissors
Optional: Hot Glue Gun
Skill Level: Easy
WRITTEN IN US TERMS
Panels (Make 2)
With Color A and H Hook,
1. Ch 13, sc across, ch 1, turn (12)
2-14. sc across, ch 1, turn, Fasten at the end of row 14. (12)
Hold panels together so that row 1 of each panel meets up at the bottom. Attach Color B to the top corner, working through both layers:
1. Ch 1, sc in same space and in the end of each row down the side putting 2 sc in the bottom corner, sc in each ch across the bottom, 2 sc in the bottom corner of opposite side, sc in the end of each row up the other side, Ch 1, turn
2. hdc in same space as ch, sl st in next st, *hdc, sl st* all the way around to the opposite corner. Fasten. Hide all strings.
Heart
With Color B and G Hook,
1. Ch 2, sc in 2nd ch from hook, ch 1, turn (1)
2. 2 sc in st, ch 1, turn (2)
3. 2 sc x 2, ch 1, turn (4)
4. 2 sc, sc x 2, 2 sc, ch 1, turn (6)
5. 2 sc, sc x 4, 2 sc, ch 1, turn (8)
6. 2 sc, sc x 6, 2 sc, ch 1, turn (10)
7. 2 sc, sc x 8, 2 sc, ch 1, turn (12)
8-9. sc in each st across, ch 1, turn (12)
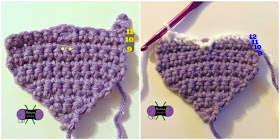
10-11. sc x 5, ch 2, sk 2, sc x 5, ch 1, turn (10 sc, 1 ch-2 sp, 2 skp'd sts)
12. dec, sc x 3, sl st in each of the skp'd sts of row 9 (make them fairly tight, do not lift them up to make them long sts), sc x 3, dec; continuing down side: sc in the end of each row down the side, (sc, ch 1, sc) in the the point of row 1, sc in each st up the other side, sc x 4, sl st x 2 (worked into other sl sts), sc x 4 across the top, sl st to join in next st. Fasten. Sew to front of one panel. Optional: Attach with Hot Glue.
Handle
Cut 3 - 15" strands of Color A & 3- 15" strands of Color B. Tie a knot in one end, pull the loose ends through the top front corner stitch, separate the strands into 3 groups of two by holding one Color A with one Color B. Braid them. Pull the loose ends through the top front corner of opposite side and then tie in a knot. Trim ends.I hope you love this pattern as much as I do!! Don't forget to add this pattern to your favorites on Ravelry so you can always find it!
Join my Blackstone Designs Crochet Community group on Facebook to stay up to date, receive special offers, pattern support, and so much more! Hope to see you there!
Written
Pattern © 2015 Sonya Blackstone of Blackstone Designs. Please do not
sell, share, or modify this
pattern, but instead share the link to where the pattern can be found.
You may sell items you make with this pattern. This pattern, as with
all Blackstone Designs/Sonya Blackstone patterns, are not for
educational use
without written permission from the designer.
Sonya Blackstone is a participant in the Amazon Services LLC Associates Program, an affiliate advertising program designed to provide a means for us to earn fees by linking to Amazon.com and affiliated sites.


These are adorable!
ReplyDeleteThank you!!! :)
DeleteThese are cute Sonya. Thank you.
ReplyDeleteYou're welcome! I'm glad you like them!!
DeleteSonya , thank you for the pattern! I can probably make these for our Valentine's Day guests at our bed and breakfast! I pinned onto Pinterest for you!
ReplyDeleteThat would be wonderful! I bet they would really enjoy that!!! -- Thank you for pinning! :D
DeleteHave to get crocheting these, cute pattern? Thanks for sharing.
ReplyDeleteVery cute! Thank you for sharing.
ReplyDeleteThank~You!!! I love these!!! I have to practice the Heart a little more ;) but LOVE!!!
ReplyDeletethank you, great giveaway to do the same with done items to spinning round
ReplyDeleteThese are perfect for the little grand daughters in my life! Thank you for sharing!
ReplyDeletelovely pattern thank you but maybe dont colour the back ground as it prints off in black and wastes all your ink apart from not being able to read it
ReplyDeleteThese are absolutely adorable! I'm currently making one for my boyfriend's little girl. I do have a question though. I'm super confused on a specific part on the heart. Where the pattern reads "sl st in each of the skp'd sts"..would you mind explaining that part a bit better please? If I follow the directions exactly, I end up a gaping hole and it just doesn't look right. Thank you!♡
ReplyDeleteThese are really cute. Thank you.
ReplyDelete