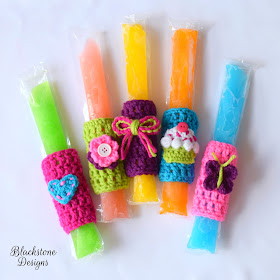
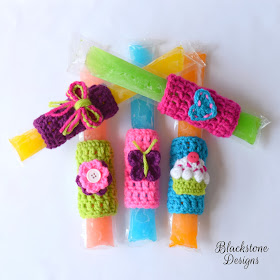
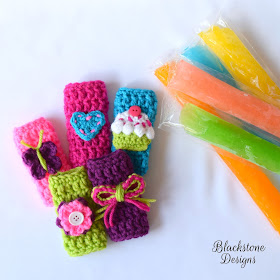
Did you see my post yesterday featuring the Monster Ice Pop Holders? I designed them in the Summer of 2013 and the following Summer, I decided I needed something tailored towards my daughter.
This post contains affiliate links
By purchasing through these product links, I will receive a small
commission for bringing you the link. This is at no extra cost to you.These popsicle covers are a great way to keep the little ones cool during the summer, without freezing tiny fingers! They are great for pool parties or summer birthday party favors. They are a huge hit with the kids!
Now, my daughter is just as excited to use popsicle covers! Truth be told, she likes the Monsters just as much as the "girly" designs!
I've been wanting to move this pattern over here for a while, but I could never find the time... until now!
Here's how to make your own:
Girly Ice Pop Holders
MATERIALS
Worsted Weight Yarn (#4)
* 5-6 colors in scrap amounts
H/8/5.00mm Hook (Bases)
G/6/4.25mm Hook (Appliqués)
2- ½” Buttons
GAUGE
Not Important for this project
STITCH
GUIDE
arnd = around
ch = chain
dc = double
crochet
dec = decrease
Puff st. = See
Special Stitches
sc = single
crochet
sl st = slip
stitch
st(s) = stitch(es)
trc = treble
crochet
SKILL
LEVEL
Beginner
Written in US Terms
NOTES
* Beginning chains
do not count as stitches
* Any glue can be
used for this project; I prefer hot glue or E6000.
* Tutorial photos
are at the end of the pattern.
SPECIAL
STITCHES
Puff
Stitch (Puff) - *Yarn
Over (YO), insert hook in stitch, pull up a loop* 5x, YO, pull through all
loops on hook.
BASE (H Hook)
1.
Ch 11, join to
form a ring, sc arnd, sl st to join (11)
2-7.
Ch 2, dc arnd,
sl st to join (11)
8.
Ch 1, sc arnd;
Fasten. (11)
BOW (G Hook)
With
Main Color,
1.
Ch 9, sc in 2nd
ch from hook and across, turn (8)
2.
Ch 1, sc across, turn (8)
3.
Ch 1, sc across, then sc down side, across
bottom, and up other side, sl st to join (20)
With
Accent Color,
4.
Ch 1, sl st arnd; Fasten. (20)
Leave long tail,
carry over to the center of the rectangle and wrap tightly around to form the
bow. Fasten.
Cut 4-4” strings,
pull them through the back side of bow center. Leave to dangle.
HEART (G Hook)
Magic Ring, Ch 3,
trc, dc x 2, ch 1, trc, ch 1, dc x 2, trc, ch 3, sl st, pull ring closed;
Fasten. (7 sts, 2 ch-3)
FLOWER (G Hook)
Outer
Flower,
Magic Ring, *Ch 3,
trc x 2, sl st* 6X, pull ring closed; Fasten. (6 petals)
Inner
Flower,
Magic Ring, *Ch 2,
dc x 2, sl st* 6X, pull ring closed; Fasten. (6 petals)
Place inner flower
on top of outer flower and sew a button to the middle to attach.
BUTTERFLY (G Hook)
Magic Ring, *Ch 3,
trc x 3, sl st* 4X, pull ring closed; Fasten.
With a contrasting
color: Cut an 8” string, wrap twice around center to create butterfly wings.
Tie a knot at the top and cut to form antenna.
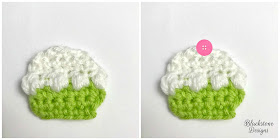
CUPCAKE (G Hook)
With
Cake Color,
1.
Ch 6, sc in 2nd
ch from hook and across, turn (5)
2.
Ch 1, 2 sc, sc x 3, 2 sc, turn (7)
3.
Ch 1, sc across, turn (7)
With
Frosting Color,
4.
Ch 1, Puff st, *sc, Puff st* across, turn
(7)
5.
Ch 1, sc across, turn (7)
6.
Ch 1, dec, sc x 3, dec, turn (5)
7.
Ch 1, dec, sc, dec; Fasten. (3)
Sew a button so
that half covers the center stitch and half stands over the top of cupcake.
FINISHING
* Attach appliqués
to center base (they can be sewn or glued)
* Optional: Add “sprinkles”
to cupcake frosting by weaving yarn in and out of stitches.
* Optional: Add
stitch marks around the edge of the heart applique by weaving in and out of
stitched around the edge only.
* Hide all strings.
Hope to see you there!!
And don't forget to add this pattern to your Ravelry favorites and Pin it for later, so you can always find it! Written pattern and photographs © 2013 Sonya Blackstone of Blackstone Designs. Please do not sell, share, or modify this pattern, but instead share the link to where the pattern can be found. You may sell items you make with this pattern. This pattern, as with all Blackstone Designs/Sonya Blackstone patterns, are not for educational use without written permission from the designer.
Sonya Blackstone is a participant in the Amazon Services LLC Associates Program, an affiliate advertising program designed to provide a means for us to earn fees by linking to Amazon.com and affiliated sites.


No comments:
Post a Comment