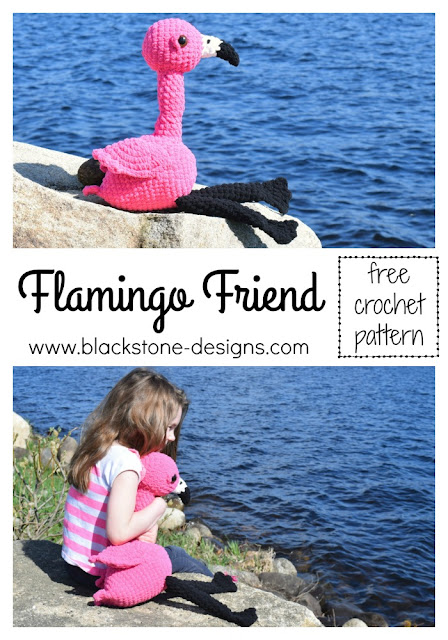
Aren't Flamingos so darn cute?! My daughter is completely in love with them, so when I signed up to do this CAL, I knew I had to make one!
The more I thought about making one, the more excited I became with the possibilities! What size will I make? What yarn will I use? What features will it have?
This post contains affiliate links.
By purchasing through these product links, I will receive a small
commission for bringing you the link. This is at no extra cost to you.
After a lot of brainstorming, I decided I really wanted it to be a big Flamingo, but I also needed to keep it pretty simple, so that it can easily be made in one week. So, I decided that I would use a thicker yarn. This will yield a bigger finished piece, with less stitch work!
Once I decided on the yarn size, I had to consider my options. I had been wanting to use Bernat Blanket yarn for quite a while, but I never had the right project. I have an afghan planned out, but I haven't had time to work up such a large project, so that made this the perfect time to give it a try!
I am pleasantly surprised with how great this yarn works up into a stuffed animal! It really is the perfect yarn for stuffies. This Flamingo Friend is plush, soft, and super cute! My daughter was very excited about adding it to her collection!
This pattern was designed as part of the CAL Central Crochet event. You can join this group on Facebook to participate.
Every Monday, from April 2nd - June 4th, there will be a new free stuffed toy pattern released.
Fairfield World generously donated the Poly-fil used to make these softies. They will also be donating a 5-lb Box of Poly-fil to the crocheter with the most votes.
Link up your projects on THIS POST from Underground Crafter to enter.
Use #CALCentral when sharing on social media.
Want to make your own? Here's how:
Flamingo Friend
Get the Ad-Free PDF on:
MATERIALS
Super
Bulky Weight Yarn (#6) [Bernat Blanket]
* Pink (5
oz)
* Black (1
oz)
* White
(Scraps)
K/10.5/6.50mmHook [Clover Amour]
Poly-fil Stuffing
24mm Animal Eyes
10” x 3/8” Wooden Dowel
YarnNeedle with Large Eye
GAUGE
Not important for this project
FINISHED MEASUREMENTS
13” tall from top of head to bottom of body.
Legs are 9.5” long.
Body is 8.75” long.
STITCH GUIDE
arnd = around
ch = chain
dc = double crochet
sc = single crochet
sl st(s) = slip stitch(es)
st(s) = stitch(es)
SKILL LEVEL
Easy
WRITTEN IN US TERMS
NOTES
* Beginning ch-1 does not count as a stitch
* This pattern can be worked in any yarn weight.
* Make sure to adjust to the appropriate hook size (example: G/6/4.00mm hook for worsted weight yarn)
* Round 1 of the head is the backside. The beak will go over the last round.
* Round 1 of the body is the front side.
HEAD
With Pink,
1. Magic ring, ch 1, 6 sc in ring (6)
2. 2 sc arnd (12)
3. *2 sc, sc* arnd (18)
4. *2 sc, sc x 2* arnd (24)
5. *2 sc, sc x 3* arnd (30)
6-11. sc arnd (30)
12. *dec, sc x 3* arnd (24) – Add eyes between rows 9 & 10
13. *dec, sc x 2* arnd (18)
14. *dec, sc* arnd (12) – Stuff Here
15. dec arnd (6)
16. dec arnd (3)
Weave tail through remaining stitches; Fasten.
BODY
With Pink,
1. Magic ring, ch 1, 6 sc in ring (6)
2. 2 sc arnd (12)
3. *2 sc, sc* arnd (18)
4. *2 sc, sc x 2* arnd (24)
5. *2 sc, sc x 3* arnd (30)
6. *2 sc, sc x 4* arnd (36)
7. *2 sc, sc x 5* arnd (42)
8. *2 sc, sc x 6* arnd (48)
9-14. sc arnd (48)
15. *dec, sc x 6* arnd (42)
16. *dec x 2, sc x 38* arnd (40)
17. *dec x 2, sc x 36* arnd (38)
18. *dec x 2, sc x 34* arnd (36)
19. *dec x 2, sc x 32* arnd (34)
20. *dec x 2, sc x 30* arnd (32)
21. *dec x 2, sc x 28* arnd (30) – Stuff Here
22. *dec, sc x 3* arnd (24)
23. *dec, sc x 2* arnd (18)
24. Flatten opening, so that the double decrease section (rounds 16-21) is centered:
sc across, working through both layers together, turn (9)
25. Ch 1, (sc, dc, ch 3, dc, sc), *sk 2, (sc, dc, ch 3, dc, sc)* 2X; Fasten. (3 tailfeathers)
NECK
With Pink,
1. Magic ring, ch 1, 6 sc in ring (6)
2. 2 sc arnd (12)
3. sc arnd (12)
4. 2 sc x 4, dec x 4 (12)
5. dec, 2 sc x 4, dec x 3 (12)
6-12. sc arnd; Fasten at the end of round 12. (12)
WINGS (Make 2)
With Pink,
1. Magic ring, ch 1, 6 sc in ring (6)
2. 2 sc arnd (12)
3. *2 sc, sc* arnd (18)
4. *2 sc, sc x 2* arnd (24)
5. *2 sc, sc x 3* arnd (30)
6. *2 sc, sc x 4* arnd (36)
7. Fold circle in half, sl st across, working through both layers together, turn (18)
8. Ch 1, *(dc x 2, sc), sl st* 2X, (dc x 2, sc, sl st). Fasten. Do not stuff. (3 feathers)
EYELIDS (Make 2)
With Pink,
Ch 4. Fasten.
LEGS (Make 2)
With Black,
1. Ch 8, join to form a ring, ch 1, sc in each ch arnd (8)
2-14. sc arnd (8)
15. *dec, sc x 2* arnd (6)
16. Flatten opening: sc across, working through both layers, turn (3)
17. Ch 1, dc x 2, dc, dc x 2, turn (5)
18. Ch 1, sc across, turn (5)
19. Ch 1, *(sc, dc, sc), sl st* 2X, (sc, dc, sc, sl st) in last st; Fasten. Do not stuff. (3 toes)
BEAK
With Black,
1. Magic ring, ch 1, 4 sc in ring (4)
2. sc arnd (4)
3. 2 sc arnd (8)
4. sc, 2 sc x 2, sc, dec x 2 (8)
5. sc arnd (8)
With White,
6. dec, sc, 2 sc x 2, sc, dec (8)
7-8. sc arnd; Fasten at the end of round 8.
FINISHING
* Sew neck over rounds 6-11 of the body.
* Insert wooden dowel through center of neck & down into body, leave 1-2” above the neck. Stuff neck firmly.
* Sew neck to round 6-9 of the head, making sure to insert the wooden dowel up through the head.
* Attach wings to sides of body, with front tip of wings over round 7.
* Attach legs to bottom of body, to round 8, so the inner legs touch.
* Place eyelids over eyes, so the top and backside are covered.
* Stitch a dot on both sides of the beak over round 7.
* Hide all strings.
Do you love it? Drop a comment!
Hope to see you there!!
And don't forget to add this pattern to your Ravelry favorites and Pin it for later, so you can always find it!
Written pattern and photographs © 2018 Sonya
Blackstone of Blackstone Designs. Please do not sell, share, or modify
this pattern, but instead share the link to where the pattern can be
found. You may sell items you make with this pattern. This pattern, as
with all Blackstone Designs/Sonya Blackstone patterns, are not for
educational use without written permission from the designer.
Sonya Blackstone is a participant in the Amazon Services LLC Associates Program, an affiliate advertising program designed to provide a means for us to earn fees by linking to Amazon.com and affiliated sites.
Labels: Bernat Blanket, Blackstone Designs, crochet pattern, Fairfield world, Flamingo, stuffed animal